
What else is there to do in lockdown other than bake?
- Abby Wilson
- May 10, 2020
- 11 min read
Who would have thought that the UK would be put on lockdown? Another three weeks? You can’t leave your house unless it’s essential and many are getting increasingly bored by the day. So it’s time to think of some activities that can be done inside the house. I have one. Baking.
Who doesn’t love an afternoon cuppa accompanied by a sweet treat? Baking is a no-brainer for me. It’s fun, it can take up a bit of time and you end up with something delicious to eat. Get down to the supermarket, stand two metres apart in the queue, drive home safely, wash your hands, roll your sleeves up, get your apron on and get baking!
If Terry’s Chocolate Orange brownies, lemon drizzle cake, white chocolate and Jammie Dodger blondies or millionaire shortbread sound good to you, read on for some simple but heavenly recipes.


Banana bread
Banana bread is a super simple to make and super tasty to taste. Maybe that’s why almost every single person seems to have made it during lockdown? If you haven’t made banana bread yet then I am very surprised. It's an isolation staple and it seems that everyone and their Nan has! It’s a perfect way of using up your extra ripe bananas that you would otherwise throw away. I like to think it’s not too bad for you as well, considering you are getting one of your five-a-day. However, don’t hold me to that, not sure that’s entirely accurate…

Ingredients:
2 ripe bananas
1 large egg
55g butter (plus extra to grease the tin)
½ tsp baking powder
140g caster sugar
170g self-raising flour
1 tsp vanilla extract
Method:
Step 1: Preheat your oven to 180C/160C Fan and line a square baking tray with greaseproof paper. I grease the tray with butter first to help the paper stick.
Step 2: In a large bowl, mash the bananas with a fork. Add the sugar, butter, egg and vanilla extract and mix until combined.
Step 3: Gradually sift in the flour and baking powder, mixing until combined.
Step 4: Pour into your pre-lined loaf tin and smooth into the corners.
Step 5: Bake for 40 minutes until golden on top. Leave to cool in the loaf tin before serving in slices.
Terry’s Chocolate Orange brownies
I am a huge fan of Terry’s Chocolate Orange and an even bigger fan of brownies. So why not combine the two? These are the ultimate, rich, moist, gooey, chocolatey brownies – they have a hint of orange peel and are packed with Terry’s Chocolate Orange chunks. If this isn’t enough to get your mouth isn’t watering, then I don’t know what is. If you follow the below recipe, prepare for a mouthful of delicious gooiness.


Ingredients:
150g dark chocolate
3 Terry’s Chocolate Oranges (1 for decoration and 2 chopped)
200g unsalted butter (plus extra to grease the tin)
3 large eggs
275g caster sugar
90g plain flour
35g cocoa powder
1 orange
Method:
Step 1: Preheat your oven to 180C/160C Fan and line a square baking tray with greaseproof paper. I grease the tray with butter first to help the paper stick.
Step 2: Melt together unsalted butter, dark chocolate and a Terry’s Chocolate Orange in a heatproof bowl over a pan of boiling water. Leave to cool.
Step 3: Use an electric whisk to whisk together the eggs and caster sugar until it turns pale, is mousse like and is double the original volume. Be patient as this can take a while!
Step 4: When whisked, pour the cooled chocolate mix over the eggs and fold together carefully. Again, be patient.
Step 5: Once combined, sift in cocoa powder, plain flour and add in the orange zest and fold together.
Step 6: Then add two whole Terry’s Chocolate Oranges (chopped into small chunks).
Step 7: Pour into prepared tin and bake in the oven for 35 minutes. Leave to cool in the loaf tin before serving in slices.
Lotus Biscoff brownies
If you're a Biscoff fan like me, these are the brownies for you. Brownies are one of my favourite things to bake and eat and I'm obsessed with Lotus Biscoff at the moment so it seemed like a no-brained to make these. They are chocolatey, gooey, fudgey, crunchy - they're amazing let's just say that.

Ingredients:
200 g dark chocolate
200 g unsalted butter (plus extra to grease the tin)
4 medium eggs (or 3 large)
275 g caster sugar (white or golden)
90 g plain flour
35 g cocoa powder
200 g Chocolate Chips
150 g Lotus Biscoff biscuits (chopped)
1/2 jar Biscoff spread
Method:
Step 1: Preheat your oven to 180C/160C Fan and line a square baking tray with greaseproof paper. I grease the tray with butter first to help the paper stick.
Step 2: Melt the dark chocolate and butter together in a heatproof bowl over a pan of boiling water. Leave to cool.
Step 3: Whisk together the eggs and sugar until thick and mousse like - it will double in volume and be a lot paler.
Step 4: Fold the chocolate/butter mix into the eggs/sugar mix carefully.
Step 5: Fold in the flour and cocoa powder. Then add in the chocolate chips and Biscoff biscuits, folding together.
Step 6: Pour brownie mixture into the tin. Using two teaspoons, spoon dollops of Biscoff Spread onto the top of the Brownies.
Step 7: Bake in the oven for 30-35 minutes. Leave to cool fully in the tin before serving in slices.
White chocolate and Jammie Dodger blondies
Brownies with a twist. For those of you that don’t know what blondies are, they are basically white chocolate brownies. I have to admit, I hadn’t had a Jammie Dodger since I was about 10 years old before I came across this recipe. But I knew I wanted to make blondies and when I saw the recipe, I thought I would give it a go. Who knew Jammie Dodgers were so good?! I can’t believe how much I have been missing out. I will warn you, these are super sweet, so if you haven’t got a sweet tooth, maybe give these a miss. But if you do, these are for you.


Ingredients:
200g unsalted butter (plus extra to grease the tin)
250g light brown soft sugar
100g light brown muscovado sugar
200g white chocolate
275g plain flour
3 eggs
1 tsp vanilla essence
24 mini Jammie Dodgers, 10 roughly chopped, 14 left whole
Method:
Step 1: Heat the oven to 190C/170C fan. Butter and line a rectangular brownie tin with baking paper.
Step 2: Gently heat the butter in a large pan over a saucepan of hot water for about 5 minutes until melted. Add the sugars and ½ of the white chocolate. Stir until melted and fully combined. Leave to cool for 10 minutes until at room temperature.
Step 3: Sift the plain flour and mix in ¼ tsp of salt.
Step 4: Add the eggs one at a time to the cooled butter and sugar mix, ensuring each egg is well combined. Stir in the vanilla, then fold in the flour. Stir in the rest of the white chocolate and the roughly chopped Jammie Dodgers.
Step 5: Spoon the mixture into the baking tin and spread until even. Gently press the Jammie Dodgers into the mixture so you can still see them.
Step 6: Bake in the oven for 25-30 minutes. Leave to cool in the tin before serving in slices.
Lemon drizzle cake
I’m a big lover of lemon drizzle cake. It is super, I repeat, SUPER quick and easy to make and it tastes unbelievable. It is deliciously moist and full of citrus flavour, with the perfect sugary, crunchy top.

Ingredients for cake:
175g caster sugar
175g self-raising flour
175g softened butter (plus extra to grease the tin)
3 eggs
1 lemon (zest)
¾ level tsp baking powder
Ingredients for lemon drizzle topping:
100g granulated sugar
1 lemon (juice)
Method:
Step 1: Preheat the oven to 180C/160C Fan and line a square baking tray with greaseproof paper. I grease the tray with butter first to help the paper stick.
Step 2: Beat together the eggs, flour, caster sugar, butter, baking powder and lemon zest until smooth in a large mixing bowl.
Step 3: Pour into your pre-lined loaf tin and smooth into the corners.
Step 4: Bake in the oven for 40 minutes, or until golden brown.
Step 5: Make the lemon drizzle topping by mixing together the sugar and the lemon juice.
Step 6: While the cake is still warm, use a toothpick or something similar to make holes in the cake. Make as many as you like as this will enable the drizzle to sink into the cake, adding to the lemony flavour.
Step 7: Pour the drizzle over the cake. Leave to cool in the loaf tin before serving in slices.
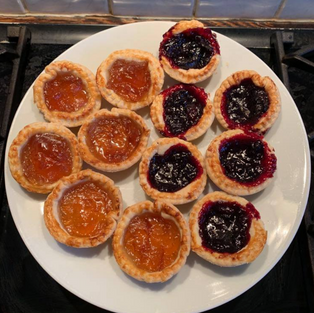
Jam tarts
Who doesn’t love a jam tart? Jam tarts remind me of my childhood and are a perfect afternoon snack. I cheated and used ready-made pastry, but if you’re up to the challenge, the ingredients to make pastry are below.

Ingredients:
250g plain flour
125g butter (plus extra to grease the tin)
1 egg
1 vanilla pod,
100g jam or marmalade (any flavour you like)
Method:
Step 1: Put the flour, butter and a pinch of salt in a bowl and rub together with your fingertips. When the mixture looks and feels like fresh breadcrumbs, stir in the egg and vanilla seeds.
Step 2: Add 1 tbsp cold water, then start to bring the dough together in one lump. Add 1 more tbsp of water if it’s not coming together, but try not to add much more than that. Wrap in cling film and chill in the fridge for 30 mins.
Step 3: Heat over to 200C/180C fan. Butter a tart tin.
Step 4: Dust your work surface with flour. Unwrap and roll out the chilled pastry so it’s the thickness of a £1 coin. Then use a round cutter to cut out 12 circles, big enough to line the holes in the tin.
Step 5: Butter the tin. Put the dough circles into the tin. Add a dollop of 1-2 tsp of your chosen filling into each one.
Step 6: Bake for 15-18 minutes or until golden.
Cinnamon rolls
I had wanted to make cinnamon rolls for quite a while but was slightly nervous as these are slightly out of my baking comfort zone. After making a few adaptations to the recipe, they tuned out great.

Ingredients:
For the dough:
300g self-raising flour
2 tbsp caster sugar
1 tsp ground cinnamon
100g butter, melted, plus extra for greasing
2 egg yolks
200ml milk, plus extra for glazing
For the filling:
2 tsp ground cinnamon
110g light brown soft sugar
4 tbsp caster sugar
2 tbsp butter, melted
For the icing:
60g icing sugar
1 tbsp cream cheese
1/2 tbsp butter
1/2 tbsp vanilla essence
Method:
Step 1: Heat oven to 180C/160C Fan. Grease a 20cm loose-bottomed cake tin and line the bottom with baking parchment.
Step 2: Make the dough. Mix the flour, caster sugar and cinnamon together with a pinch of salt in a bowl. Whisk the butter, egg yolks and milk together and combine with the dry ingredients to make a soft dough.
Step 3: Turn out onto a floured surface and roll out to a rectangle, about 30 x 25cm.
Step 4: Mix the filling ingredients together. Spread evenly over the dough then roll it up lengthways, like a Swiss roll, to form a log. Using a sharp knife, cut the dough into 8 even-sized slices and pack into the prepared tin. Brush gently with extra milk and bake for 30-35 mins or until golden brown. Remove from the oven and cool for 5 mins before removing from the tin.
Step 5: Sift the icing sugar into a large bowl. Add the cream cheese and butter and pour over 2 tbsp boiling water, and stir to mix. Add a little more water until you have a drizzly consistency. Stir in the vanilla essence, then drizzle the icing over the rolls.
Peanut butter and jam flapjacks
Flapjacks with a twist. Who said flapjacks had to be boring? Add the classic American combo of peanut butter and fruity jam for a flapjack with a difference.

Ingredients:
5 tbsp salted butter (plus extra to grease the tin)
250g crunchy peanut butter
8 tbsp strawberry or raspberry jam
80g light brown soft sugar
200g rolled oats
Method:
Step 1: Heat the oven to 180C/160C. Butter and grease the base and sides of a 20cm square cake tin.
Step 2: Put 3tbsp each of the peanut butter and jam in separate small bowls and set aside. Step 3: Tip the remaining peanut butter, the rest of the jam and the butter and sugar into a pan and set over a medium heat, stirring until everything has melted together. Stir in the oats and then leave to cool for 5 minutes.
Step 4: Spoon the mixture into the prepared cake tin and gently press down with your hands. Dot over the reserved peanut butter and jam.
Step 5: Bake in the oven for 20-25 minutes or until golden brown. Leave to cool in the tin before serving in slices.
Millionaire Shortbread
If you're looking to make the ultimate sweet-treat, with a layer of crunchy shortbread, gooey caramel and velvety chocolate, the classic millionaire shortbread is for you. Surprisingly straightforward to make and tastes divine.

Ingredients:
For the shortbread:
250g plain flour
75g caster sugar
175g butter, softened
For the caramel:
100g butter
100g light muscovado sugar
2 x 397g cans condensed milk
For the topping:
200g milk chocolate Method:
Step 1: Heat the oven to 180C/160C Fan. Lightly grease a tin.
Step 2: Make the shortbread. Mix the plain flour and caster sugar together in a bowl. Rub in the softened butter until the mixture resembles fine breadcrumbs. Then knead the mixture together until it forms a dough. Press into the base of the prepared tin. Prick the shortbread lightly with a fork and bake for 20 minutes. Leave to cool.
Step 3: Make the caramel. Put the butter, light muscovado sugar and two cans of condensed milk into a pan and heat gently until the sugar has dissolved. Bring to the boil, stirring all the time, then reduce the heat and simmer very gently, stirring continuously, for about 5-10 minutes or until the mixture has thickened slightly. Pour over the shortbread and leave to cool.
Step 4: Make the topping. Melt the milk chocolate slowly in a bowl over a pan of hot water. Pour over the cold caramel and leave to set. Cut into squares to serve.
Lotus Biscoff cheesecake
I’m a big fan of Lotus Biscoff biscuits so I knew that I wanted to make something else with them. I had already made brownies so I thought why not try a cheesecake? Not necessarily baking I know, but still a delicious treat that is super easy to make. This rich and creamy cheesecake is perfect for Biscoff lovers.

Ingredients:
For the base:
250g Lotus Biscoff biscuits
100g unsalted butter
For the filling:
500g cream cheese
100g icing sugar
300ml double cream
1 tsp vanilla extract
100g smooth Lotus Biscoff spread
For the topping:
50g smooth Lotus Biscoff spread
50g Lotus Biscoff biscuits
Method:
Step 1: Lightly grease the base and sides of a round springform tin.
Step 2: Make the base. Whiz the biscuits in a food processor until finely ground. Pour in the butter (melted) and pulse until combined. Tip the biscuit mixture into the prepared tin. Press and smooth down with the back of a spoon. Put into the fridge to chill.
Step 3: Make the filling. Use a hand-held electric whisk, beat together the cream cheese and icing sugar until smooth. Then beat in the double cream and vanilla until the mixture is thick and holds its shape.
Step 4: Spoon half the cream cheese mixture into the tin, spread roughly to level. Then dollop over teaspoonfuls of the Biscoff spread and spread evenly. Tip the remaining cream cheese mixture over the top and spread to cover completely. Chill in the fridge for at least 6hours or overnight.
Step 5: When ready to serve, making the topping. Put the Biscoff spread in a heatproof bowl. Stir frequently until smooth and runny. Next roughly crush the biscuits using the end of a rolling pin.
Step 6: Remove cheesecake from tin and transfer to a plate. Drizzle half the melted spread over the top of the cheesecake, then scatter the biscuits on top. Drizzle over the remaining spread.
Chocolate Rice Krispie cakes
Last but not least, definitely the easiest thing you will ever make. I know you don't need to bake these, but if you want to make something super quick, these are great. Many recipes tell you to add butter and golden syrup, but if you do it my way, you literally need two ingredients. It saves a lot of time and effort, you don't need to go out and spend a fortune and they taste amazing.

Ingredients:
250g milk chocolate
120g Rice Krispies
Toppings of your choosing
Method:
Step 1: Melt the chocolate in a heatproof bowl over a pan of boiling water.
Step 2: In a large bowl, add the melted chocolate to the Rice Krispies and mix until well coated.
Step 3: Spoon the mixture into cake cases.
Step 4: Decorate with toppings of your choice. I like to use mini eggs or mini creme eggs for mine, but any chocolate, sweets, sprinkles or nuts will work well. Leave to set in the fridge for 1 hour before eating.
So what are you waiting for? Well you may be waiting in the queue to get into the supermarket, but if you can get your hands on the ingredients, get going!
(Just an FYI, I will be continuing to bake more throughout lockdown so keep an eye on this post as I will be updating it with more recipes soon!).


Comments